Friday, June 12, 2009

Lack of Crafts

Not too much crafting going on this week. I've been busy CLEANING and ORGANIZING my craft room! While it's been functional, it has been no where near ideal for creativity. I thought about taking a before picture, but it would just be too embarrassing to share. Everyone thinks I'm so clean and organized; best not to ruin my reputation.
All of my stuff is now organized and put away in the closet. There's really nothing left in the room except for my desk and another Tupperware drawer thingy. Everything that you see on these shelves was in piles all over the room, on the floor. LITERALLY covering the floor. The room is so much nicer to go into now. And it's great to close the door on all my stuff and not have to look at it!
But I did get some of my squares done yesterday for my quilt along. I now have 46 done; 24 to go!
Posted by Picasa

Helping Daddy Wash the Car

There's a HUGE inside joke with us and Dale's brother and his wife about making our children help wash the car. So we decided it's never too late to get started.

I remember being VERY little and helping my dad wash the car. It was one of my most favorite things to do with him. I loved the bubbles and the soap was pink- even better. I loved the smell of the hose water. My dad even let me use one of those special brushes for the tires. One of the best memories I have with my dad.
There's no way I'm letting Brighton miss out on those fun time and these great memories. And it's another excuse for her to wear her cute swimsuit.
Posted by Picasa

Wednesday, June 10, 2009

Pay It Forward: Gift #3

This gift had to travel all the way to Utah! I hear they've received it FINALLY and am so excited to share it with you!
I've been friends with Scott for a long time. I remembered that his favorite hymn was "Families Can Be Together Forever" and his wife, Kristin, does their family blog, which is called "Our Familyz Forever." I figured that would be a great theme for my gift to them!
Kristen had some super great photos taken around Christmas time (I think!) and I loved this one. I actually want to get one with Dale, Brighton and I like it.
So, I did some tweaking in Picasa- made it black and white and increased both shadows and highlights. Then I painted that image onto a canvas! Pretty fun, I think. I'm definitely going to make something like this again.
Kristin, Scott, and Emily I'm glad to hear you enjoy your new gift!
Reminder: I haven't seen any blog news about other Pay It Forward gifts going out. Get your butts in gear! It's already June and you only have until the end of the year!

Posted by Picasa

Tuesday, June 9, 2009

Baby Shower Gift

My friend Megan just had a little girl, and this morning was her baby shower. I've been DYING to show off these cute little things, so now I can!
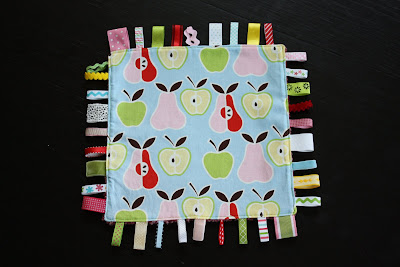
Did I mention how in love I am with Alexander Henry's Apples + Pears? Because I am. I like how it's very NON-traditional for baby items. I made this little tag blanket for Aubrey to snuggle with and chew on when she gets a bit bigger.
And the other side of the blanket is this soft lamb's wool kind of fabric. I was going for some nice texture.
I also appliqued some of those pears and apples to a little onesie. And because no girl should ever be without ruffles falling off of her...
... here's the back! So fun. I used this tutorial. I'm sure I could have figured it out myself, but it's so nice to have some one tell you the measurements and give you the step by step.
Then I wrapped it all up in this little purse that Aubrey can use when she gets bigger. Thanks Bri for the tag blanket and bag inspiration!

Congrats Megan! I'm so excited that you have a little girl to be all girly with!

Friday, June 5, 2009

The Garden Is Sprouting!

Ok, Dale and I are NO experts when it comes to gardening. We know nothing about it, and just thought we'd kind of wing it this summer, see how it goes, and learn for next year. Dale is better than I am at keeping things green. I killed a potted cactus a few years ago, seriously, a cactus, and a house plant not too long ago.
We finally planted all the seeds last weekend (I know, but better late than never!). We didn't do any starters in the house. I was just lazy and didn't want cups all over the place and, again, we figured we'd just "learn by doing" this year. Here's some of the cucumber peeking out of the ground. I think I'm supposed to thin it out in a bit- I'll have to double check. But hey- it's growing! In our super crappy soil that's mostly rocks and clay- yay! We figured, if the strawberries can handle it, perhaps the veggies can too.
And, my family will LOVE this- here are my radishes! I say MY because Dale has already told me he's not going to eat them, ever. I guess it's just me and my family that love radishes. More for me! I know that I have to thin these little sprouts out soon.

Yay, they're alive! Maybe I have a green thumb hidden somewhere after all. I can't wait for more little green guys to peek out of the ground!
Posted by Picasa

Brighton's Village Frock

I can't believe I forgot to share this with you earlier in the week! Again, that pile of WIPs is getting pounded into- I've had the fabric sitting on my desk with the pattern ever since Dale got it for me for my birthday.

I am IN LOVE with this pattern, and so grateful that I had my serger. It seriously looks so professional, at least to me. And Dale- the great husband that he is- paid me the awesome compliment that it looks like something you'd buy in a store! The pattern was VERY easy to follow with great illustrations and precise directions. I only wish that Brighton could fit into it now.

I worked every free moment I had last Friday and finished it up last Saturday, ready for her to wear it to church on Sunday. The smallest size on the pattern is a 2T, but this seemed like it would fit her. Nope. I've got a few more months to wait, as do you, to see her in it.

FYI- If you end up getting this pattern (link), add a few inches to the length of the dress if you don't want it to be too short. The designer of the pattern tends to like things short (as she puts it at the end of the instructions- I guess I should have read ahead) and the dress is the perfect length now- who knows what it will be like in a few months. I've got my fingers crossed it's not TOO short by then. But I guess it gives me plenty of time to make a matching set of bloomers?
Posted by Picasa

Wednesday, June 3, 2009

Reusable Grocery Bags

I have a pile of things in my craft room that are "Works in Progress" (WIPs) and I'm starting to finally dig through it and get stuff done!

I've been wanting to make these bags for at least a year now, so I finally did it (thanks Bri, you motivated me after you made yours!). I used a fabric shower curtain that I bought at Target on clearance for $2. I got four bags out of it and still have some fabric left over- we'll see where it pops up. It's a lightweight canvas material, so it should hold up to use. Isn't it so fun!? The fun thing about these bags is they have a little pouch sewn to the inside, so you can fold these up and store them in your purse or glove box, or just tossed into your trunk. They're always handy!

I think they'll make grocery shopping fun again! And you can feel even better about using bags that you've made because they weren't made in a sweatshop (if you know the reference to that one, let me know; maybe you'll get a prize).
Posted by Picasa

First Strawberries

We've got like 20 strawberry plants in the backyard. I love them, they're my favorite, and that's why we have so many. I've been checking them EVERY SINGLE DAY anticipating some wonderful goodness in my mouth. Yesterday afternoon, Brighton was so excited to help me pick the ripe ones. She carried them around in this little bowl and couldn't wait to dig in. She even started saying "strawberry" and running around laughing.
YUMMY!
Posted by Picasa

Monday Sunshine!

Man, I am just lovin' this weather! Lots of sunshine and it's hot! Brighton and I are spending most afternoons outside, playing and having summer fun! Here's Brighton with her *new* outside toys!
We went garage sale hunting Saturday morning and picked up some great finds- Dale found old baseball cards, I got four embroidery books and 3 quilt pattern books, some fabric, new shoes for the little boy, some old dress shirts to alter into summer dresses for Brighton, a new shirt for me, an apron for B, these two riding cars, a plastic green bucket that I thought would be great for B to hawl around rocks, and a wooden lighthouse that I'm going to paint for the baby's room. I think that's it... but we only spent $26.50! I love garage sales. And B has no idea that these toys aren't new- I think that's what I love the most. Whenever I tell her we're going to go outside, she says, "outisde, cars" because she knows she gets to play with them!
I put out the sprinkler so the kids could cool off. Sawyer was looking a little hot and ran through a few times himself.
B loves the sprinkler!
She kept running back and forth, laughing and shreeking. It was such a fun afternoon!
Posted by Picasa

Monday, June 1, 2009

Crib Skirt Tutorial

I'm sure you all could figure this out, but I thought I'd make it easy on you by giving you all the measurements that you need!

I used my daughter's old crib skirt as a sort of template, but this one is for a boy- less girly! Or if you don't have a crib skirt to look at, here you go!

A few things first:
1. I wanted the hanging panels of the skirt to hang straight. I've included measurements if you decide you want it to be a little ruffly.
2. Also, on the long sides (not the short sides) I added a pleat. I'll show you how I did this, and you can also do it on the short sides if you want. Or you can just have all sides hang straight! I've got measurements for that too!
3. My daughter's crib skirt was WAY too long and didn't look so nice once we lowered the crib mattress. I made this skirt so that it will hang ever so nicely once the mattress is on it's lowest setting. So, length is up to you.

Let's get started!
1. Wash and press your fabric. I like to use lots of starch! It keeps things nice and crisp.

2. Cut the deck of the bed skirt (the part that the mattress will sit on) 28"x51" just like the picture below!


2. Here's where the options come in:

option a: ALL hanging panels to lay flat
1a. Cut 2 pieces for the long sides 51"x13" (On the crib, I measured from the
bottom of the mattress to the floor and added an inch (12+1=13") - you can
customize to your own crib by doing the same (if you do, substitute that number
in for the 13").
2a. Cut 2 pieces for the short sides 28"x13".

option b: ALL sides to have a pleat in the center
1b. Cut 2 pieces for the long sides 55"x13".
2b. Cut 2 pieces for the short sides 33"X13".

option c: ALL hanging panels to be ruffly:
1c. Cut 2 pieces for the long sides 77"x13".
2c. Cut 2 pieces for the short sides 42"x13".

You now have 5 pieces ready to go!


3. On each hanging panel: serge (don't trim any fabric off) or zig zag stitch both short sides and ONE long side. You should have only ONE raw edge on the long side of each panel when you're done.


4. On the long, serged side of each hanging panel, fold over 1/2" towards the wrong side of the fabric. Press. Pin in place and sew that baby down! Then do the same on the short, serged sides.


Three sides of each hanging panel should be beautifully hemmed, with still that one long side on each raw and untouched!


5. Sewing the panels to the deck! Here's where all our options come in again.
option a: All flat hanging panels
1a. On your deck, find the center of each side and place a pin there.
2a. On the raw edge of each panel, find the center and place a pin there.
3a. With right sides facing, line up the center pins for each side and pin together.
option b: Pleats (we'll do that below)
option c: All ruffly hanging panels
1c. On your deck, find the center of each side and place a pin there.
2c. On the raw edge of each panel, sew a basting stitch (be sure thread tension is set
low) about 1/4" away from edge.
3c. On that same edge of the panels, find the center and place a pin there.
4c. With right sides facing, line up the center pins for each panel and pin together.
Pull on the bobbin thread of your basting stitches to gather the panel into a
ruffle that is a 1/2" shorter on each side than the length of your deck. Pin in
place.


There will be an extra 1/2" of deck fabric on each side of hanging panels which is why it is VERY important to line up those centers! Sew each panel to the deck using a 1/2" seam.


Option b: Pleats!
1b. On your deck, find the center of each side and place a pin there.
2b. On the raw edge of each panel, find the center and place a pin there. On the RIGHT SIDE
of your fabric, measure 2" to the left and right of your center pin, and mark with a pin.
3b. Bring the left side pin towards the center pin so that there is now only 1" between pins,
folding the fabric over. Pin in place. See picture below.
4b. Do the same with the right side and pin. Baste the pleat in place.
This is what your pleat should look like:
5b. With right sides facing, line up center of pleat with center pin on deck. Pin along the raw
edges and sew with a 1/2" seam.


6. Serge all four raw edges together.
7. Press the seam towards the deck and pin in place.


8. Be sure to fold the corners in nicely!
9. Top stitch that seam and there you go! All done!
You can see, I did a pleat just on the long sides.
I'm no expert! Let me know if anything is confusing and I'll try to explain it better. Also, let me know if you make a crib skirt of your own, I'd love to see it.




Posted by Picasa